Mini Heart Cake with Red Velvet
Highlighted under: Modern Food
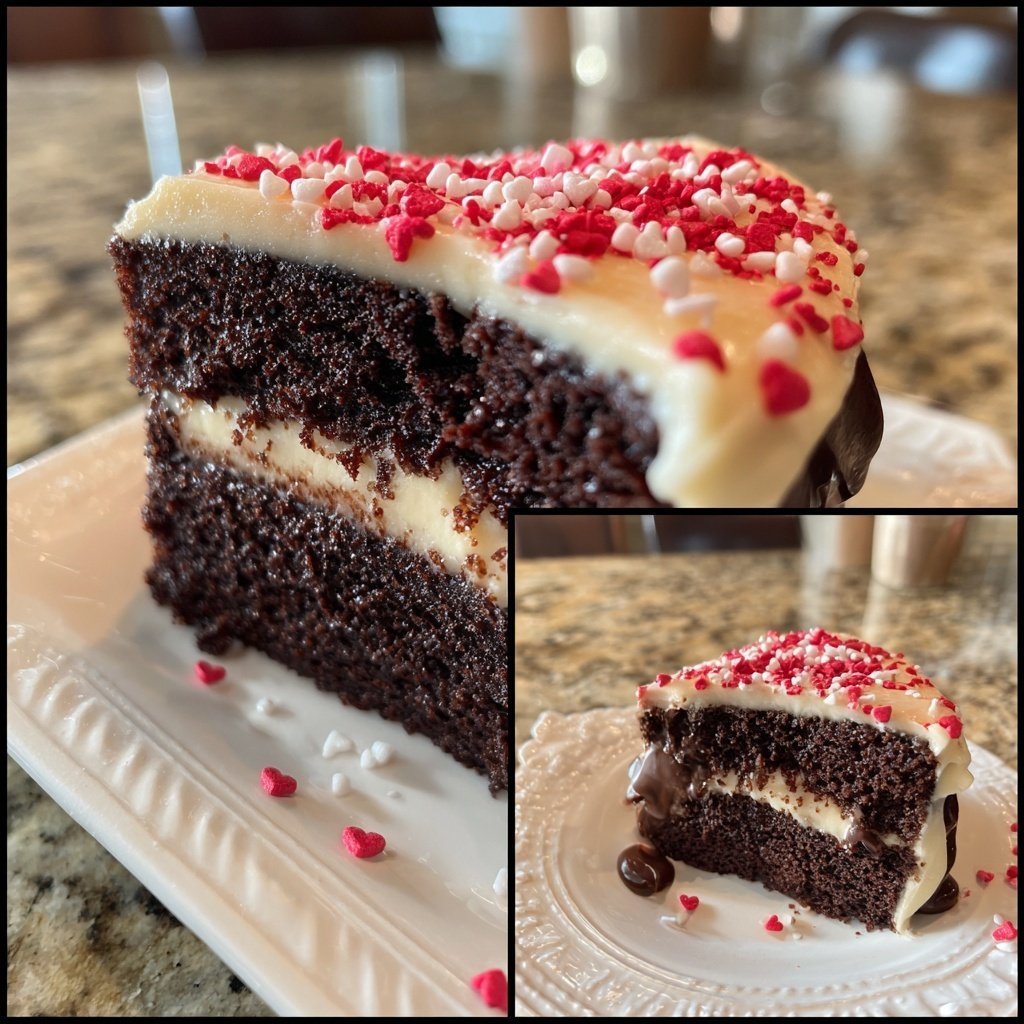
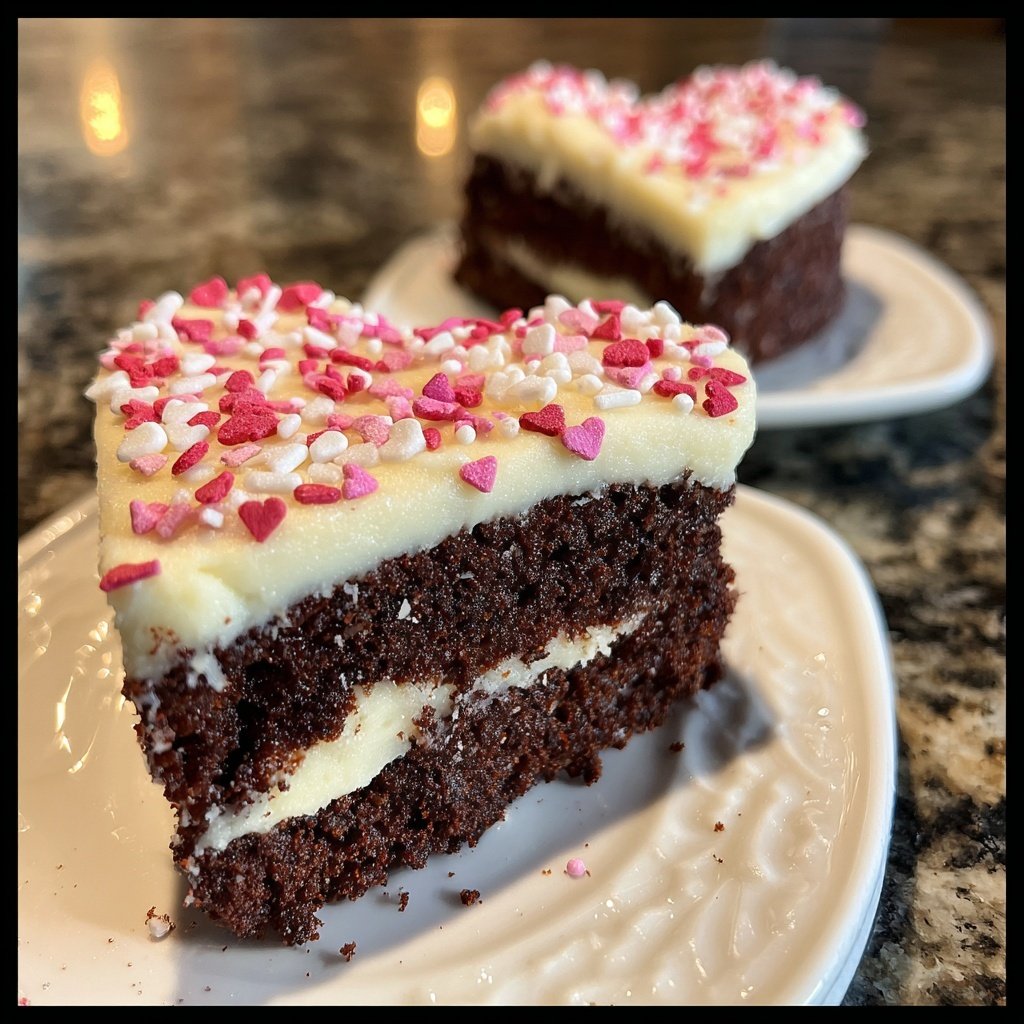
I’m excited to share this delightful Mini Heart Cake with Red Velvet that has quickly become a favorite in our home. The combination of rich cocoa flavor and vibrant red hue creates a visually stunning treat that’s perfect for any occasion. I love how these cakes capture the essence of love, making them ideal for celebrations or just a personal indulgence. The process is simple yet rewarding, allowing the chocolatey aroma to fill the kitchen as they bake.
When I first baked these Mini Heart Cakes, I was amazed by how moist and flavorful they turned out. I experimented with different cake flour and baking techniques, finally settling on the right balance that keeps the texture light while still delivering that signature red velvet taste. It’s incredible how a few tweaks can elevate a simple recipe into something truly special.
One key tip I discovered is to use buttermilk for a creamier texture, paired with a touch of vinegar to enhance the red color. This combination not only elevates the flavor but also keeps the cake tender and fluffy. Every bite is a reminder that baking is as much about love as it is about ingredients!
Why You'll Love This Cake
- Rich chocolate flavor paired with fresh orange zest
- Creamy texture that melts in your mouth
- Perfect for celebrations or as a sweet indulgence
The Importance of Ingredients
Using high-quality cocoa powder is crucial for achieving that rich chocolate flavor characteristic of this Mini Heart Cake. Opt for a Dutch-processed cocoa for deeper notes and a smoother texture, which enhances the overall taste. Also, ensure your butter and cream cheese for the frosting are adequately softened—this helps create a creamy consistency without lumps, ensuring a luxurious mouthfeel in every bite.
Buttermilk plays a vital role in tenderizing the cake due to its acidity, which activates the baking soda. If you don't have buttermilk on hand, you can easily make a substitute by adding one tablespoon of lemon juice or white vinegar to a cup of milk and letting it sit for about 10 minutes. This will replicate the tangy flavor and acidity needed for the cake.
Techniques for Perfect Baking
To guarantee even baking, make sure you level the cake batter in each heart-shaped pan. I like to use an offset spatula for this purpose; it provides an even distribution and helps smooth the surface. Additionally, always preheat your oven before placing the cakes inside; this ensures that they rise uniformly and develop a nice structure without being dense.
Keep an eye on the baking time; ovens can vary in temperature accuracy. Start checking your cakes around the 20-minute mark by inserting a toothpick in the center. If it comes out clean or with a few moist crumbs, your cakes are ready. Overbaking can lead to a dry texture, which is the last thing you want for this moist and tender treat.
Frosting and Presentation Tips
When it comes to the cream cheese frosting, ensure it’s smooth and glossy for easy spreading. If it becomes too thick, don’t hesitate to add more milk, one tablespoon at a time. This precision allows you to achieve your desired consistency for a clean finish. Try to frost the cake in a two-step process: first apply a thin crumb coat to trap any loose crumbs, refrigerate for about 30 minutes, then proceed with the final layer of frosting for a polished look.
For a decorative touch, consider adding fresh fruit or chocolate shavings on top of the finished cake. This not only enhances its visual appeal but also complements the rich flavors. Additionally, you can easily turn this recipe into cupcakes; just fill the liners about two-thirds full and adjust the baking time to about 15-18 minutes.
Ingredients
Gather these ingredients to start your baking adventure!
For the Mini Heart Cakes
- 1 cup all-purpose flour
- 1 cup granulated sugar
- 1/2 cup unsweetened cocoa powder
- 1 teaspoon baking soda
- 1/2 teaspoon salt
- 1 cup buttermilk
- 1/2 cup vegetable oil
- 2 large eggs
- 2 tablespoons red food coloring
- 1 teaspoon vanilla extract
- 1 teaspoon white vinegar
For the Cream Cheese Frosting
- 4 ounces cream cheese, softened
- 1/4 cup unsalted butter, softened
- 2 cups powdered sugar
- 1 teaspoon vanilla extract
- 1-2 tablespoons milk, as needed
Make sure to measure your ingredients accurately for the best results!
Instructions
Follow these steps to bake your Mini Heart Cakes perfectly!
Prepare the Cake Batter
In a large bowl, combine the flour, sugar, cocoa powder, baking soda, and salt. In another bowl, whisk together the buttermilk, vegetable oil, eggs, red food coloring, vanilla extract, and vinegar. Gradually add the wet ingredients to the dry ingredients and mix until just combined.
Bake the Cakes
Preheat your oven to 350°F (175°C) and grease your heart-shaped cake pans. Pour the batter evenly into the pans and bake for 20-25 minutes or until a toothpick inserted in the center comes out clean. Allow the cakes to cool for 10 minutes before transferring them to a wire rack to cool completely.
Make the Cream Cheese Frosting
In a mixing bowl, beat the softened cream cheese and butter together until creamy. Gradually add the powdered sugar and vanilla extract, mixing well. If the frosting is too thick, add milk one tablespoon at a time until you achieve your desired consistency.
Assemble the Cakes
Once the cakes are completely cool, place one layer on a plate, spread a layer of frosting on top, and then place the second layer on top. Frost the top and sides of the cake evenly with the remaining cream cheese frosting.
Your Mini Heart Cake is now ready to be enjoyed!
Pro Tips
- For an extra special touch, consider adding sprinkles or edible glitter on top of the frosted cake. You can also pipe some additional frosting decorations around the edges for a more festive look.
Storage and Make-Ahead Tips
This Mini Heart Cake can be baked in advance, making it a convenient option for events. Once completely cooled, wrap the cake layers individually in plastic wrap and store them in the refrigerator for up to 3 days. If you wish to keep them longer, consider freezing them. To freeze, wrap the layers securely and place them in an airtight container, where they will keep for up to 3 months.
When ready to serve, allow the frozen cakes to thaw in the refrigerator overnight. For optimal frosting texture, prepare the cream cheese frosting fresh on the day of serving. However, if you prefer, the frosting can be made a day ahead and kept stored in the fridge in an airtight container—just remember to give it a good stir before using to bring back its smoothness.
Troubleshooting Common Issues
If your cakes dome excessively while baking, it may be due to oven temperature being too high. Make sure to use an oven thermometer to verify the actual temperature inside. Reducing the heat by 25°F and baking slightly longer can help achieve a more level cake, making for easier stacking and decorating.
Another common issue is a dense cake texture. This could occur from overmixing the batter after adding the wet ingredients, which develops gluten in the flour. Aim to mix until just combined, and don't hesitate to use a spatula for folding to prevent overworking the batter for a lighter crumb.
Flavor Variations
While the classic red velvet flavor is unforgettable, you can put your own spin on this cake by incorporating different extracts. For a touch of citrus, add a bit of orange or lemon zest to the batter; it adds brightness that perfectly contrasts with the richness of the cake. Additionally, feel free to swap out half of the cocoa powder for finely chopped nuts or chocolate chips to introduce a delightful crunch.
For special occasions, consider layering the cake with jam or fruit preserves between the cake layers. Raspberry or strawberry complements the chocolate flavor well, providing a tartness that cuts through the creaminess of the frosting. This small addition can elevate the cake and impress your guests.
Questions About Recipes
→ Can I make this recipe gluten-free?
Yes, you can substitute all-purpose flour with a gluten-free flour blend for a gluten-free option.
→ How should I store the leftover cake?
Store any leftover cake in an airtight container in the refrigerator for up to 3 days.
→ Can I freeze these cakes?
Absolutely! You can freeze the baked cakes without frosting. Wrap them well in plastic wrap and place them in a freezer-safe bag for up to 2 months.
→ What can I use instead of buttermilk?
If you don’t have buttermilk, you can create a substitute by adding 1 tablespoon of vinegar or lemon juice to 1 cup of milk. Let it sit for a few minutes before using.
Mini Heart Cake with Red Velvet
Created by: Una Whitcombe
Recipe Type: Modern Food
Skill Level: Intermediate
Final Quantity: 4 servings
What You'll Need
For the Mini Heart Cakes
- 1 cup all-purpose flour
- 1 cup granulated sugar
- 1/2 cup unsweetened cocoa powder
- 1 teaspoon baking soda
- 1/2 teaspoon salt
- 1 cup buttermilk
- 1/2 cup vegetable oil
- 2 large eggs
- 2 tablespoons red food coloring
- 1 teaspoon vanilla extract
- 1 teaspoon white vinegar
For the Cream Cheese Frosting
- 4 ounces cream cheese, softened
- 1/4 cup unsalted butter, softened
- 2 cups powdered sugar
- 1 teaspoon vanilla extract
- 1-2 tablespoons milk, as needed
How-To Steps
In a large bowl, combine the flour, sugar, cocoa powder, baking soda, and salt. In another bowl, whisk together the buttermilk, vegetable oil, eggs, red food coloring, vanilla extract, and vinegar. Gradually add the wet ingredients to the dry ingredients and mix until just combined.
Preheat your oven to 350°F (175°C) and grease your heart-shaped cake pans. Pour the batter evenly into the pans and bake for 20-25 minutes or until a toothpick inserted in the center comes out clean. Allow the cakes to cool for 10 minutes before transferring them to a wire rack to cool completely.
In a mixing bowl, beat the softened cream cheese and butter together until creamy. Gradually add the powdered sugar and vanilla extract, mixing well. If the frosting is too thick, add milk one tablespoon at a time until you achieve your desired consistency.
Once the cakes are completely cool, place one layer on a plate, spread a layer of frosting on top, and then place the second layer on top. Frost the top and sides of the cake evenly with the remaining cream cheese frosting.
Extra Tips
- For an extra special touch, consider adding sprinkles or edible glitter on top of the frosted cake. You can also pipe some additional frosting decorations around the edges for a more festive look.
Nutritional Breakdown (Per Serving)
- Calories: 380 kcal
- Total Fat: 26g
- Saturated Fat: 15g
- Cholesterol: 195mg
- Sodium: 85mg
- Total Carbohydrates: 32g
- Dietary Fiber: 3g
- Sugars: 24g
- Protein: 6g